If you're setting up cwrsync to run as a Service on a Windows machine ensure the .conf file has the line:
strict modes = false
otherwise rsync passwords will not work in Windows.
FAQs
Problem with secrets file
How can I make pre-exec and post-exec work ?
As of version 2.6.7, rsync server can kick scripts before and after transfers. You can use the recipe below to implement this very handy functionality in cwrsync server:
- Install Copssh and Cwrsync Server.
- Start a windows command shell from cwrsync start menu and make a copy of bash.exe as sh.exe in the bin directory.
copy bin\bash.exe bin\sh.exe - Create two script files in the bin directory for pre-exec operations:
c:\program files\ICW\bin\pre-exec.sh
# Shell script for your pre-exec operations
cmd /c "c:\program files\ICW\bin\pre-exec.cmd"
exit 0
c:\program files\ICW\bin\pre-exec.cmd
@ECHO OFF
..... - Create two script files for post-exec operations as described above.
- Update your rsyncd.conf file:
# Module definitions
path = .....
......
pre-xfer exec = /bin/pre-exec.sh
post-xfer exec = /bin/post-exec.sh
Why is it called cwRsync?
Use of vocals would be inappropriate (!) as the word rsync has no vocals in it, and this package is also dependent on Cygwin:
CYGWIN + RSYNC
How can I secure connections between Windows rsync clients and cwRsync servers ?
On WINSERVER:
Install cwRsync Server and Copssh into the same directory.
- Start RsyncServer and OpenSSHD services
- Activate a user (test1 in our example below) via Copssh control panel and specify c:\backup as home directory.
- Add a new module to rsyncd.conf :
[backup]
path = /cygdrive/c/backup
read only = false
transfer logging = yes
on WINCLIENT :
- Download cwRsync client
- Create a batch file for automation (the example below copies contents of c:\windows\fonts\s* to the directory behind the rsync module test at the server side via a secure ssh tunnel:
@ECHO OFF
SET CWRSYNC_DIR=C:\cwrsync_client_x64
SET CHANNEL_ID=Secure_Channel_ABC
SET LOCALPORT=9119
SET REMOTEPORT=873
SET REMOTEHOST=192.168.100.21
SET REMOTEUSER=lab1user
SET RSYNCMODULE=test
SET SOURCEDIR=/cygdrive/c/windows/fonts/s*

echo Establish secure channel ...
start "%CHANNEL_ID%" /MIN %CWRSYNC_DIR%\bin\ssh -L %LOCALPORT%:127.0.0.1:%REMOTEPORT% %REMOTEUSER%@%REMOTEHOST% -T -N -f

"%CWRSYNC_DIR%\bin\rsync" -vrt %SOURCEDIR% "rsync://localhost:%LOCALPORT%/%RSYNCMODULE%"

echo Terminate secure channel ...
taskkill /FI "WINDOWTITLE eq %CHANNEL_ID%"
Can rsync transfer security/ownership information between two windows machines ?
cwRsync itself has no support for it. However, after an rsync operation, you can use Robocopy (standard in more recent Windows versions), to transfer all windows specific file information (NTFS security, timestamps, attributes, ownership, auditing info):
ROBOCOPY source destination /XO /XN /XC /E /COPY:ATSOU
options /XO (exclude older), /XN (exclude newer) and /XC (exclude changed) assure that only existing files are targeted. Option /E is for recursive directory operation including empty ones. Option /COPY:ATSOU instructs Robocopy to copy only attributes (A), timestamps (T), NTFS security information (S), Ownership O) and auditing (U).
How can I use cwRsync between two windows machines within a secure network ?
Assuming that you want to synchronize from directory c:\srcdir on machine WINCLIENT to directory c:\destdir on machine WINSERVER :
On WINSERVER :
- Install cwRsync Server
- Start RsyncServer service
- Make sure that the service account has write access to c:\destdir.
- Add a new module to rsyncd.conf :
path = /cygdrive/c/destdir
read only = false
transfer logging = yes
On WINCLIENT :
- Download cwRsync client.
- Use the command below to initiate rsync communication:
".\bin\rsync" -av /cygdrive/c/srcdir/ WINSERVER::wintest
NB! Keep in mind that the recipe above is suitable for operations within a secure network.
How can I secure connections between linux/unix rsync clients and cwRsync servers ?
On Windows:
- Install Copssh and cwRsync server. Use the same service account.
- Start RsyncServer and OpenSSHD services
- Activate a user
- Import your public key via Copssh Control Panel:
- Make sure that the user and the service account has write access to c:\backup
- Add a new module to rsyncd.conf :
[backup]
path = /cygdrive/c/backup
read only = false
transfer logging = yes
On Linux:
- Use shell script below after having it updated according to your needs:
#!/bin/bash
localport=9119
remoteport=873
remotehost=192.168.100.21
rsyncmodule=backup
remoteuser=lab1user
sourcedir=/bin/

echo Establishing secure channel ...
ssh -L $localport:127.0.0.1:$remoteport $remoteuser@$remotehost -T -N -f

rsync -vrt $sourcedir rsync://localhost:$localport/$rsyncmodule

echo Terminating secure channel ...
ps ax | grep "ssh -L $localport" | awk '{print $1}' | xargs -i kill {} 2&>/dev/null
How can I change port number used by rsync server ?
Rsync server uses port 873 by default. You can add port directive to the configuration file rsyncd.conf to specify an alternative port.
port new-port-number
Restart the service.
I want to set up ssh communication without passwords !!
Here is a simple recipe ( NB! This is not a very secure solution, since we use null passphrase during generation of public key pairs, use it at your own risk):
- cwRsync client. Generate key pairs :
ssh-keygen -q -t rsa -f cwrsync -N ""
Files cwrsync and cwrsync.pub will be generated.
- Transfer cwrsync.pub to your *nix machine.
- *nix machine. Run following commands:
mkdir -p ~$user/.ssh
cat cwrsync.pub > ~$user/.ssh/authorized_keys
chmod 755 ~$user ~$user/.ssh
chmod 644 ~$user/.ssh/authorized_keys
chown $user ~$user ~$user/.ssh ~$user/.ssh/authorized_keys
- cwRsync client. Update your rsync commands in your batch file by specifying option -e "ssh -i cwrsync".
How can I secure connections between cwrsync clients and unix/linux servers ?
cwRsync has all ssh binaries you need to establish ssh communication.
Use batch file example in the cwRsync client package to set up communication correctly.
Why does my cwrsync try to load ssh?
It's trying to fire up ssh because your target has a single colon in it.
server:/path/to/stuff means "fire up ssh or rsh and make me a tunnel to
server"
server::module/path/to/stuff means "try to access an rsync daemon on
server and access path/to/stuff on module"
/path/to/stuff means "access /path/to/stuff on the local machine"
Hope that helps.
by Jim Salter
Rsync does not recognize windows paths in a correct manner !
Windows paths may contain a colon (:) as a part of drive designation and backslashes (example c:\, g:\). However, in rsync syntax, a colon in a path means searching for a remote host.
Solution: use absolute path 'a la unix', replace backslashes (\) with slashes (/) and put -/cygdrive/- in front of the drive letter.
Example :
C:\WORK\* --> /cygdrive/c/work/*
How can I pull files from windows to linux/unix within a secure network ?
Assuming that you want to pull directory c:\backup on Windows machine to /var/backup on Linux machine:
On Windows machine :
- Install Cwrsync Server
- Start RsyncServer service
- Add a new module to the configuration file rsyncd.conf :
path = /cygdrive/c/backup
read only = true
transfer logging = yes
On Linux machine :
- Use the command below to initiate rsync:
rsync -vrt windows_machine::backup /var/backup
NB! Keep in mind that the recipe above is suitable for operations within a secure network.
Can cwRsync co-exist if cygwin is already installed ?
YES: Cygwin 1.7 binaries used by Cwrsync allow co-existence of multiple Cygwin implementations.
Permissions on files/directories are cluttered/mixed up !
If you run into permissions problems or your directories' security ACLs are populated by some unwanted groups/users, you need to make sure that:
- File ../etc/fstab exists with at least the content below (with Unix line endings even if the file has only one line!):
none /cygdrive cygdrive binary,posix=0,user,noacl 0 0
That will instruct Cygwin not to touch permissions.
NB! You may experience very slow transfer rates and/or building the file list may take long time. You can remove /etc/fstab and use the option --no-perms option instead. The problem can also be related to real-time anti-virus scanning. Consider file/folder exclusion if possible.
More information:
How can I use rsync to pull files from windows to linux/unix within a secure network ?
Assuming that you want to pull directory c:\backup on machine WIN_SOURCE to directory /var/backup on machine LINUX_DEST :
On WIN_SOURCE :
- Install cwRsync Server (without openssh component)
- Start RsyncServer service
- Add a new module to rsyncd.conf :
On LINUX_DEST :
path = /cygdrive/c/backup
read only = true
transfer logging = yes
- Use the command below to initiate rsync:
rsync -av WIN_SOURCE::backup /var/backup
NB! Keep in mind that the recipe above is suitable for operations within a secure network.
cwRsync client is too slow!
Try to remove /etc/fstab and use the option --no-perms option instead. The problem can also be related to real-time anti-virus scanning. Consider file/folder exclusion if possible.
I can't use long path names
From Windows Developer network:
“In the Windows API (with some exceptions discussed in the following paragraphs), the maximum length for a path is MAX_PATH, which is defined as 260 characters. A local path is structured in the following order: drive letter, colon, backslash, name components separated by backslashes, and a terminating null character. For example, the maximum path on drive D is "D:\some 256-character path string<NUL>" where "<NUL>" represents the invisible terminating null character for the current system codepage. (The characters < > are used here for visual clarity and cannot be part of a valid path string.)
The Windows API has many functions that also have Unicode versions to permit an extended-length path for a maximum total path length of 32,767 characters. This type of path is composed of components separated by backslashes, each up to the value returned in the lpMaximumComponentLength parameter of the GetVolumeInformation function (this value is commonly 255 characters). To specify an extended-length path, use the "\\?\" prefix. For example, "\\?\D:\very long path".”
Even if the underlying APIs may have support for really long paths, the problem occurs due to user interface tools like Windows Explorer, Cmd prompt and PowerShell which don't support Unicode variants of the Windows APIs. The result is then path names up to 256 chars. As of version 1.7, Cygwin uses unicode Windows APIs, you can use tools like bash shell or nano editor for management of files/paths with long names.
Log example for cwRsync transfer with long path names:
...
2014/03/25 22:08:42 >f+++++++++ backup/0123456789012345678901234567890123456789012345678901234567890123456789012345678901234567890123456789
/0123456789012345678901234567890123456789012345678901234567890123456789012345678901234567890123456789
/0123456789012345678901234567890123456789012345678901234567890123456789012345678901234567890123456789
/0123456789012345678901234567890123456789012345678901234567890123456789012345678901234567890123456789/testfile
...
How to handle large log files effectively ?
Try to append the option tail to the logpath parameter of your jail definition. Win2ban will then start to read from the end of the file instead of from the beginnning. Visit Fail2ban man page https://www.systutorials.com/docs/linux/man/5-jail.conf and search for tail for more information.
How can I configure Win2ban for Windows Remote desktop/Network logons?
- Protecting RDP/Network logins against brute force attacks is enabled as default.
- Start services win2ban_winlogbeat and win2ban_fail2ban
Sample /var/log/fail2ban.log:
2018-04-06 15:31:41,113 fail2ban.server         : INFO    Starting Fail2ban v0.10.2
2018-04-06 15:31:41,193 fail2ban.database       : INFO    Connected to fail2ban persistent database '/var/lib/fail2ban/fail2ban.sqlite3'
2018-04-06 15:31:41,197 fail2ban.jail           : INFO    Creating new jail 'copssh'
2018-04-06 15:31:41,205 fail2ban.jail           : INFO    Jail 'copssh' uses poller {}
2018-04-06 15:31:41,205 fail2ban.jail           : INFO    Initiated 'polling' backend
2018-04-06 15:31:41,207 fail2ban.filter         : INFO      maxLines: 1
2018-04-06 15:31:41,233 fail2ban.server         : INFO    Jail copssh is not a JournalFilter instance
2018-04-06 15:31:41,235 fail2ban.filter         : INFO    Added logfile: '/winlogbeat/logs/eventlog' (pos = 36044, hash = 4bd8f42a7d4b980d2921fe03ed7ffaf1)
2018-04-06 15:31:41,236 fail2ban.filter         : INFO      maxRetry: 2
2018-04-06 15:31:41,236 fail2ban.filter         : INFO      encoding: UTF-8
2018-04-06 15:31:41,237 fail2ban.actions        : INFO      banTime: 600
2018-04-06 15:31:41,237 fail2ban.filter         : INFO      findtime: 600
2018-04-06 15:31:41,239 fail2ban.jail           : INFO    Creating new jail 'win2ban-network-logon'
2018-04-06 15:31:41,239 fail2ban.jail           : INFO    Jail 'win2ban-network-logon' uses poller {}
2018-04-06 15:31:41,239 fail2ban.jail           : INFO    Initiated 'polling' backend
2018-04-06 15:31:41,242 fail2ban.filter         : INFO    Added logfile: '/winlogbeat/logs/eventlog' (pos = 0, hash = 4bd8f42a7d4b980d2921fe03ed7ffaf1)
2018-04-06 15:31:41,243 fail2ban.filter         : INFO      maxRetry: 2
2018-04-06 15:31:41,243 fail2ban.filter         : INFO      encoding: UTF-8
2018-04-06 15:31:41,243 fail2ban.actions        : INFO      banTime: 600
2018-04-06 15:31:41,244 fail2ban.filter         : INFO      findtime: 600
2018-04-06 15:31:41,246 fail2ban.jail           : INFO    Jail 'copssh' started
2018-04-06 15:31:41,248 fail2ban.jail           : INFO    Jail 'win2ban-network-logon' started
2018-04-06 15:32:32,709 fail2ban.filter         : INFO     Found 192.168.122.13 - 2018-04-06 15:32:29
2018-04-06 15:32:39,423 fail2ban.filter         : INFO     Found 192.168.122.13 - 2018-04-06 15:32:36
2018-04-06 15:32:40,189 fail2ban.actions        : NOTICE   Ban 192.168.122.13
2018-04-06 15:42:37,563 fail2ban.actions        : NOTICE   Unban 192.168.122.13
How can I configure Win2ban for brute force attacks against Copssh ?
- Protecting Copssh against brute force attacks is enabled as default.
- Start services win2ban_winlogbeat and win2ban_fail2ban
Sample /var/log/fail2ban.log:
2018-04-05 23:54:28,411 fail2ban.server         : INFO    --------------------------------------------------
2018-04-05 23:54:28,411 fail2ban.server         : INFO    Starting Fail2ban v0.10.2
2018-04-05 23:54:28,442 fail2ban.database       : INFO    Connected to fail2ban persistent database '/var/lib/fail2ban/fail2ban.sqlite3'
2018-04-05 23:54:28,446 fail2ban.jail           : INFO    Creating new jail 'copssh'
2018-04-05 23:54:28,447 fail2ban.jail           : INFO    Jail 'copssh' uses poller {}
2018-04-05 23:54:28,447 fail2ban.jail           : INFO    Initiated 'polling' backend
2018-04-05 23:54:28,448 fail2ban.filter         : INFO      maxLines: 1
2018-04-05 23:54:28,467 fail2ban.server         : INFO    Jail copssh is not a JournalFilter instance
2018-04-05 23:54:28,468 fail2ban.filter         : INFO    Added logfile: '/winlogbeat/logs/eventlog' (pos = 19020, hash = c54619552ccd10f356c0810faec6cdba)
2018-04-05 23:54:28,468 fail2ban.filter         : INFO      maxRetry: 2
2018-04-05 23:54:28,469 fail2ban.filter         : INFO      encoding: UTF-8
2018-04-05 23:54:28,469 fail2ban.actions        : INFO      banTime: 600
2018-04-05 23:54:28,470 fail2ban.filter         : INFO      findtime: 600
2018-04-05 23:54:28,472 fail2ban.jail           : INFO    Jail 'copssh' started
2018-04-05 23:55:20,525 fail2ban.filter         : INFO     Found 192.168.122.13 - 2018-04-05 23:55:19
2018-04-05 23:55:23,787 fail2ban.filter         : INFO     Found 192.168.122.13 - 2018-04-05 23:55:22
2018-04-05 23:55:23,953 fail2ban.actions        : NOTICE   Ban 192.168.122.13
2018-04-05 23:58:22,875 fail2ban.actions        : NOTICE   Unban 192.168.122.13
2018-04-06 00:54:57,531 fail2ban.server         : INFO    Shutdown in progress...
2018-04-06 00:54:57,531 fail2ban.server         : INFO    Stopping all jails
2018-04-06 00:54:57,532 fail2ban.filter         : INFO    Removed logfile: '/winlogbeat/logs/eventlog'
2018-04-06 00:54:58,328 fail2ban.jail           : INFO    Jail 'copssh' stopped
2018-04-06 00:54:58,332 fail2ban.database       : INFO    Connection to database closed.
2018-04-06 00:54:58,333 fail2ban.server         : INFO    Exiting Fail2ban
How can I unban IP-address(es) manually
Initiate win2ban-shell at the root of the installation directory
Command to unban specific addresses:
fail2ban-client unban ip-address ip-address ...
Command to unban all IP-addresses:
fail2ban-client unban --all
How can I verify if a ban rule is in effect for a specific jail ?
Initiate win2ban-shell at the root of the installation directory and issue the command below (example jail win2ban-network-logon):
$ fail2ban-client status win2ban-network-logon
Status for the jail: win2ban-network-logon
|- Filter
| |- Currently failed: 1
| |- Total failed: 5
| `- File list: /winlogbeat/logs/eventlog
`- Actions
|- Currently banned: 1
|- Total banned: 2
`- Banned IP list: 192.168.100.22
The related firewall rule(s) can be displayed by using the following Powershell command:
get-netfirewallrule -all | Where-Object {$_.DisplayName -like "win2ban*"} | Format-Table
Name DisplayName DisplayGroup Enabled Profile Direction Action
---- ----------- ------------ ------- ------- --------- ------
{F9BAA4EB-D8A8-48C7-9205-D3246D70F990} win2ban - ban 192.168.100.22 True Any Inbound Block
Connection fails with "no matching host key type found." message
The problem may be related to the potentially incompatible changes introduced in OpenSSH 6.7 (included in Copssh 5 and higher) to remove unsafe algorithms.
- If you run Copssh 5.8.1 or higher, you can update the configuration via GUI: Copssh Control Panel - Configuration - Advanced - HostKeyAlgorithms or alternatively, you can add following line to the section of the configuration file control/bin/copsshcp.config:
HostKeyAlgorithms=+ssh-rsa,ssh-dss
- Restart the service via Copssh Control Panel
I can't install copssh on a localized version of windows !
-
**UPDATED** Copssh Control Panel introduced in version 4 has solved that problem. Previous Copssh versions and copsshadm command line tool still have that problem.
This is a known error related to the localized names of the groups administrators and users. There is no solution yet. However, You can use the workaround below:
- Rename localized equivalents of the groups administrators and users to something readable in latin (can be done via Administrative Tools->Computer Management->Local Users and Groups for example)
- Run copssh installer
- Rename the groups above back to their original values.
How can I protect Copssh against brute force attacks ?
You can use our Win2ban which is a Fail2ban implementation for Windows with Elastic Winlogbeat as the eventlog shipper. Check the related Win2ban FAQ for details: How can I configure Win2ban for brute force attacks against Copssh ?
Connection fails with "no matching cipher found" message
The problem may be related to the potentially incompatible changes introduced in OpenSSH 6.7 (included in Copssh 5 and higher) to remove unsafe algorithms.
If you run Copssh 5.8.1 or higher, you can update the configuration via GUI:
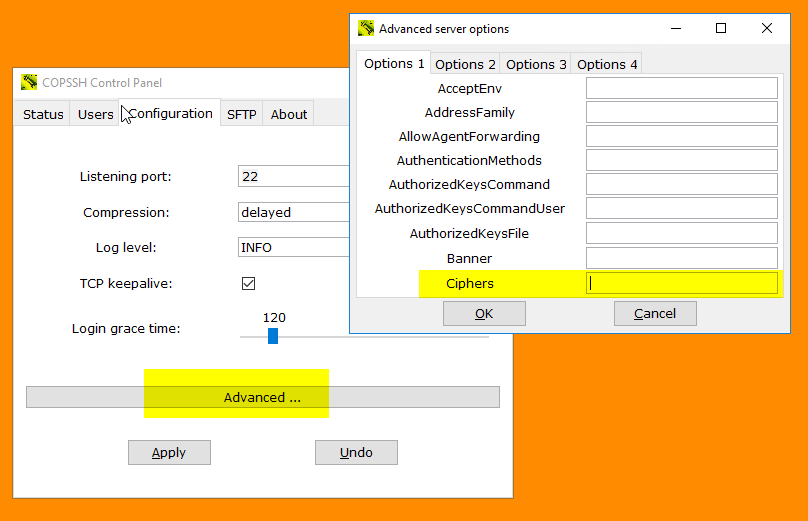
- Alternatively, you can add following line to the section of the configuration file control/bin/copsshcp.config before starting Copssh Control Panel:
Ciphers=+aes128-cbc,3des-cbc,aes192-cbc,aes256-cbc
- Restart the service via Copssh Control Panel
Connection fails with "Fatal: Unable to negotiate a key exchange method" message
The problem may be related to the potentially incompatible changes introduced in OpenSSH 6.7 (included in Copssh 5 and higher) to remove unsafe algorithms.
- If you run Copssh 5.8.1 or higher, you can update the configuration via GUI - Configuration -> Advanced -> KexAlgorithms, set value to +diffie-hellman-group1-sha1
- Alternatively, you can add following line to the section of the configuration file control/bin/copsshcp.config before starting Copssh Control Panel:
KexAlgorithms=+diffie-hellman-group1-sha1
- Restart the service via Copssh Control Panel
Which user privileges are required by a Copssh service account ?
Copssh versions 7 and higher use local system account as the service account and no further adjustments are necessary.
However, you may still prefer to use a dedicated service account (domain account for example). Make sure that the service account is member of local Administrators group and have following user rights:
SeCreateTokenPrivilege
SeAssignPrimaryTokenPrivilege
SeIncreaseQuotaPrivilege
SeServiceLogonRight
Tools to set user rights: Domain Group Policy Management for domain members, Local Security Policy (secpol.msc) for local computers
I can't login as an ordinary user !
**NB: This FAQ doesn't apply to Copssh 4.3.1 and up as they handle the problem automatically. You may still need to fix it on DCs for example.
By default, normal users are not allowed to log on locally on domain controllers. Same restrictions may also apply for other Windows systems . User right Allow log on locally needs to be delegated for proper login.
One-time procedure:
- Create a security group for COPSSH users.
- Add your group to the list of authorized credentials for the required user right:
Administrative Tools--> Domain Controller Security Policy for domain controllers or Local Security Policy for other Windows systems) --> Local Policies--> User Rights Assignment--> Allow Log on locally
For every ordinary copssh user:
- Make the user a member of the group mentioned above.
- Activate user in Copssh control panel
I want to use my own PKA key pair instead of the one generated by copssh!
- Activate a user via Copssh control panel
- Import your public key via Control Panel (your public key must have three fields - key type, key itself and a comment):
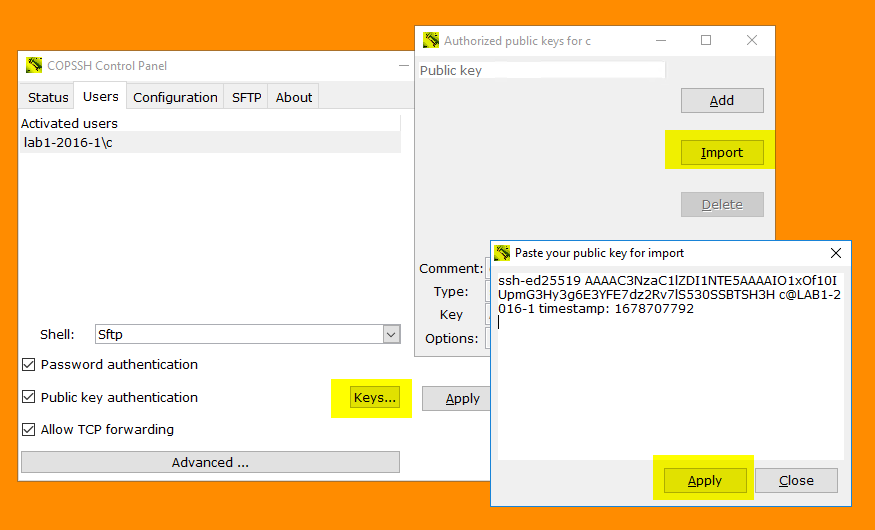
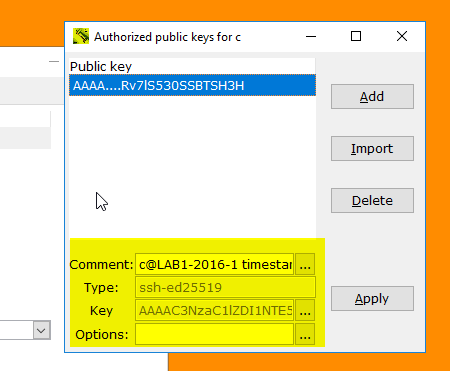
- Your Copssh server is ready to accept PKA based on your keys.
Can I change the location of home directories ?
Copssh Control Panel User activation wizard allows you to specify a home directory of your own choice:
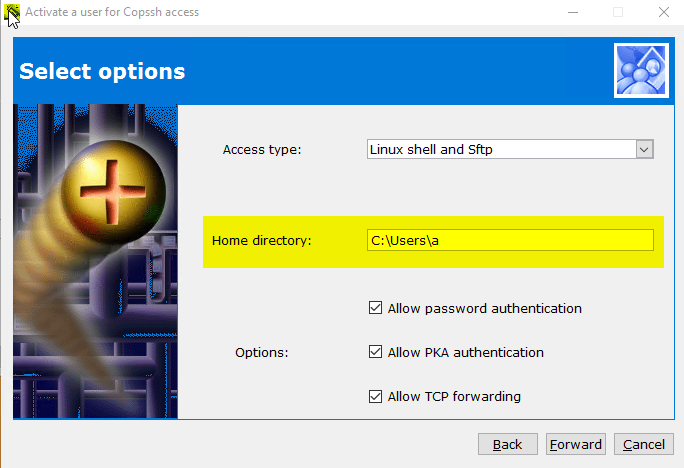
I want to set up ssh communication without passwords !!
Activate a user and create a PKA key pair with empty passphrase via Copssh control panel:
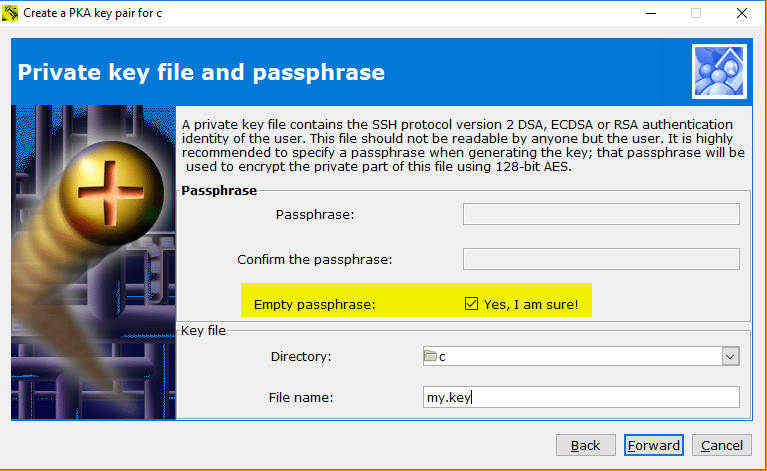
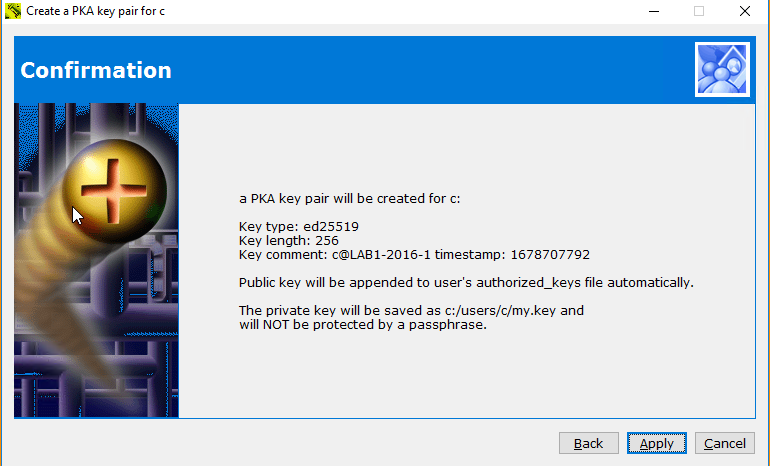
- You can take your private key with you and initiate passwordless connections from other machines. An example to start ssh shell:
ssh -i my.key user@copssh_host
NB! Your private key is NOT protected by a passphrase and can be used by anyone. Keep it safe!
How can I limit users' access to their home directories only ?
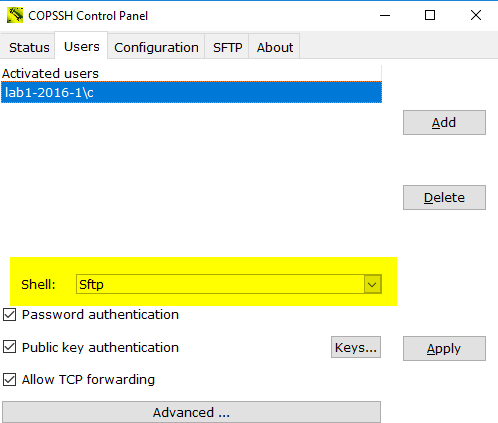
- Activate a user and select access type Sftp via Copssh control panel. Access type Sftp instructs Control Panel to make required arrangements for a chrooted environment.
- Activation of a new user with access type SFTP:

- Change access type of an already activated user to SFTP (You may need to restart the service in some occasions)
How to make copssh service dependent on other services ?
-
Dependent on software or configuration issues on your PC, copssh service may sometimes not start properly. The problem can be a service, a device helper, anti virus, firewall and so on, interferencing operations of the copssh service.
A possible solution is to delay the service startup until the problem services are started successfully. You can use the procedure below to make copssh service dependent on MyService:
- Create the following REG_MULTI_SZ value in the registry if it doesn't exist before:
HKEY_LOCAL_MACHINE\SYSTEM\CurrentControlSet\Services\OpenSSHServer\DependOnService- Add MyService to the registry value created above. It is possible to specify multiple entries separated by space.
- Restart your PC.
How can I activate users/groups and set up public keys ?
Activating users/groups can be done in multiple ways:
- Using AllowUsers/AlowGroups directives globally - requires that user does have a Windows profile directory

- Create a match block for a specific user/group (you can use directory isolation to specify a specific directory instead of user profile directory)


Copying public key can be done via Tools -> Copy public key. It uses the tool ssh-copy-id. You can use localhost to contact the copssh server.

How can I rotate Copssh log file ?
Copssh 8 syslog daemon writes log messages to /var/log/messages as default. You may need to introduce a log rotation scheme to keep growth of that file under control.
You can use the recipe below to use our free tool logwot8 for that purpose.
- Install logwot8 to a separate directory
- Edit the configuration file logwot8.conf according to your requirements. The example below will rotate the log file weekly by keeping last 12 weeks of log activiy in compressed files. See documentation for more options.
# Remember cygwin path conventions: 'c:\work' becomes '/cygdrive/c/work'
compress
create

"/cygdrive/c/copssh_x64/var/log/messages {
    rotate 12
    weekly
}- Create a Windows scheduled task running the batch file logwot8.cmd weekly.
How can I make a clean install without losing the existing setup ?
In some situations, it may be necessary to make a clean install to make an upgrade work. You can do it by following steps below:
- Backup your host keys in etc directory (etc/ssh_host*)
- Uninstall the existing version of Copssh
- Remove remnants of the installation directory except home directories if they exist
- Make sure that the service account and the sshd account are removed if they exist
- Install new Copssh
- Restore host keys back to etc directory
- Start Copssh Control Panel and verify that the service is running
- Activate your users again and specify their existing home directories as the home directory during the activation
How do I access files/drives/resources outside the Copssh root directory?
- Start a bash shell, locally or remotely
- Change to the user's home directory if it is not already done
- Link a directory or network share to a local name by using ln command
Examples:
creates a link from D:\pub to pub in the user's home directory.
ln -s "//myserver/netdata" "netdata"
creates a link from \\myserver\netdata to netdata in the user's home directory.
Now, the user can use pub and netdata to access D:\pub and/or \\myserver\netdata respectively.
Copssh stops to work after a Windows update
The problem can be related to address changes of Windows DLLs after a Windows update operation. That behaviour may create collisions for more static Cygwin DLLs, especially in a 32-bit environment. We suggest to reboot the system as a first measure. You may need to install Copssh again by using our recipe which allows to keep an existing configuration intact. Consider to install the 64-bit version (available only in the product edition) if the problem still persists.
How can I run Openssh daemon in debug mode ?
-
Sometimes it may be necessary to see directly how the openssh daemon reacts to startup or connection requests, to be able to locate daemon-related problems.
- Stop Openssh SSHD (system name:OpenSSHServer) service
- Right click Start a Unix Bash Shell from Copssh start menu (assuming that you have admin privileges)
- Enter the following command from the bash prompt:
/bin/sshd -p <listening port> -D -d -eThis will start openssh daemon in standalone debug mode and messages will be displayed on the screen. You may specify up to three -d for increased output verbosity.
- Try to initate a putty session and watch messages at the server side.
How do I improve the security of Copssh ?
-
Some recommendations (not all of them can be applicable in your case, no sorting by importance):
Recommendation Benefits/Side effects How Change port 22 to something non-standard Reduces your vulnerability surface dramatically by taking a well-known parameter out of equation, not applicable if you have a general purpose server. Security by obscurity ? Yes. However, there are many script kiddies out there bombing port 22 wherever they find. Conf.file etc\sshd_config: port Reduce the maximum number of concurrent unauthenticated con-
nectionsReduces your vulnerability surface by allowing a smaller number of potentialy dangerous attacks simultaneously. Conf.file etc\sshd_config: MaxStartups (default 10) Turn off authentication by password. Use public key authentication instead. Eliminates the most widely used technique of potential attacks: cracking passwords. Conf.file etc\sshd_config: PasswordAuthentication no
PubkeyAuthentication
(default yes)Restrict access by host Use your firewall setting to limit hosts authorized for access Restrict access by user/group Conf.file etc\sshd_config:
AllowUsers
AllowGroups
Why is it called copssh?
-
I am fond of fancy and short names :-))
Cygwin + OPENSSH is a qualified guess !!
What are licensing terms ?
Our licenses are perpetual (non-expiring), authorizing the customer to use a specific version of the software indefinitely. The license is paid for once and does not need to be renewed.
How does maintenance work ?
Maintenance is valid for the duration selected during purchasing, and includes a download link and access to https://support.itefix.net
Download link will always point to the latest version available. That way, you can keep your installations up to date.
What options are available for resellers ?
As a reseller you can buy the product via our webshop You can then provide an alternative delivery e-mail of your customer to send license keys, login and download information.
Are renewals/subcriptions available ?
Our licences are perpetual and maintenance (support & upgrades) up to three years included. We don't offer subscriptions/auto renewals.
What do I get upon a successful purchase ?
Upon a successful purchase, you will receive an instant e-mail with the deliverables below:
- Download link. This link will always point the latest version available.
- License key
- Access to https://support.itefix.net by your e-mail address
Access to downloads/support system will expire after the maintenance period purchased.
NB! A receipt/invoice will be sent in a separate e-mail and may take some time.